

Polymer Clay Covered Pencils
- lisa walker
- Nov 5, 2020
- 2 min read
This is an 'archive' tutorial - originally posted on the Guild's website many years ago by Sue Heaser - the original founder and president of the BPCG.
Polymer Clay pencils are surprisingly easy to make and, like polyclay pens, can be decorated in countless different ways. These pencils are made entirely of polymer clay apart from the pencil lead and can be sharpened like any ordinary pencil. Materials
Polymer clay in the colour of your choice
Pencil lead for a clutch pencil - these are available from art supply shops. HB is a good choice for a general use pencil. They usually come in lengths of about 6 inches. They are about the thickness of an ordinary wooden pencil lead - 1/16 in approx. Propelling pencil leads are too fine.
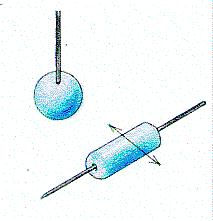
Step 1 Form a ball of clay, about 1 inch diameter. Lay this on your work surface and pierce it with the pencil lead, straight down the centre, as though it was a large bead. You will need to be careful with the pencil lead as it will snap if handled too roughly. Pick up the ball and push the lead right through it until it is in the centre. Lay it on its side on your work surface and roll gently as shown so that the ball becomes a cylinder and begins to extend in both directions along the lead. If the clay works away from the lead, stop rolling and squeeze it back on firmly, then continue.

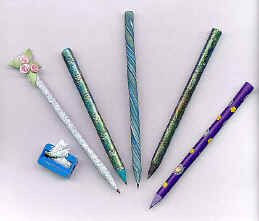
Step 2 When the clay has extended all the way along the lead, roll it lightly to make sure that the pencil is an even thickness. Make sure, also, that it is not too thick to fit into a pencil sharpener or you will have to sharpen it with a knife. You can trim the ends if they have extended beyond the lead. Now pinch the clay into a point at the sharp end of the lead. this will make it easier to sharpen later. Decorate the pencil in your chosen way. The left hand pencil in the photograph is made using Cernit Nature's Colours and applying rosebuds. The others are stamped, caned and marbled. Apply a disk of clay to the end to stop the lead from pushing out when the pencil is sharpened.

Step 3 Bake the pencil for about 30 minutes or longer to be sure it is as strong as possible. When it is cool, grasp the pencil near to the sharp end and carefully sharpen it. It will flex slightly more than a wooden pencil but you will find the polymer clay sharpens easily and has the added attraction of being coloured! Marbled pencils are even more fun as the sharpened end has lovely unpredictable swirls.


Comments